
안녕하세요. 이번 시간에는 자료구조 끝판왕 AVL 트리에 대해 알아보겠습니다. 가장 복잡하고 가장 어려운 강좌가 될 거 같습니다. 저도 구현하는 데 엄청 애를 먹었던 자료구조입니다.
전전 시간에 했던 이진 검색 트리 기억하시나요? 왼쪽은 작다, 오른쪽은 크다 이렇게 두 가지로 나눠서 편하게 값을 찾을 수 있었습니다. 하지만 다음과 같은 이진 검색 트리에서는 문제점이 발생합니다.
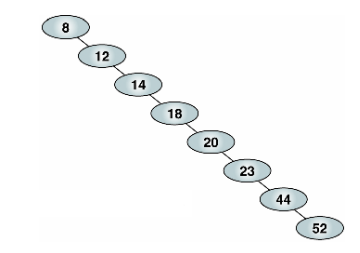
위와 같은 트리는 한 쪽으로 쏠려있어서 원하는 자료를 찾으려면 루트부터 끝까지 탐색을 해야 찾을 수 있습니다. 시간 복잡도가 O(lg(n)) 대신 O(n)까지 늘어나게 되어 이진 검색 트리를 사용하는 장점이 없어진 겁니다. 이러한 한계를 극복하고자 AVL 트리가 탄생하였습니다. AVL은 이 자료구조를 만든 세 명의 이름 앞 글자를 딴 겁니다.
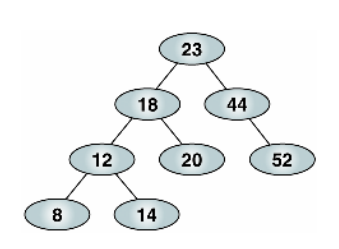
AVL 트리는 이진 검색 트리이면서 동시에 균형을 유지하고 있습니다. 모든 노드의 왼쪽과 오른쪽 서브트리의 높이 차이가 1 이하입니다. 위의 그림에서 좌우 높이 차이가 1보다 큰 트리를 찾을 수 있나요? 없죠. 이렇게 균형을 유지하고 있기 때문에 이진 검색 시의 효율성을 보장할 수 있습니다.
문제는 균형을 유지하는 방법이 좀 많이 복잡하다는 겁니다. 새로운 노드를 넣거나 뺐을 때 왼쪽으로 돌리고, 오른쪽으로 돌리는 등 별의별 짓을 다 해야 균형이 유지됩니다. 그 별의별 짓을 저와 같이 해보겠습니다...
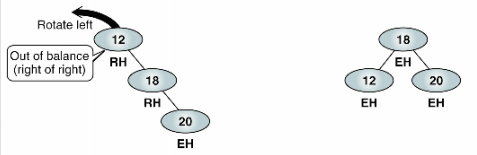
AVL 트리에서는 좌우 높이 차가 1보다 커지면 균형이 무너진 것입니다. 균형이 무너진 유형에는 4가지가 있습니다. LL, RR, LR, RL입니다. 하나씩 보겠습니다.
LL
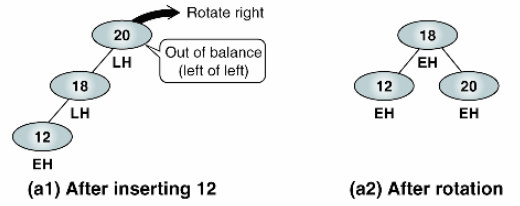
균형이 무너진 첫 유형입니다. 왼쪽은 2인데 오른쪽은 0이죠? 2 차이가 나서 균형이 무너졌습니다. 이럴 때는 우회전 한 번을 해줍니다.
RR
오른쪽은 2인데 왼쪽은 0이네요. 역시 균형이 무너진 상태입니다. 이럴 때는 좌회전을 한 번 해줍니다.
RL
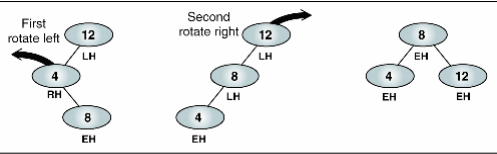
왼쪽은 2, 오른쪽은 0인데 LL과는 살짝 다릅니다. 왼쪽 서브트리의 모습이 다르죠.('<' 모양) 이 때는 두 번째 노드를 좌회전 한 번 후, 전체 노드를 우회전 한 번 해줍니다.
LR
LR은 RL과 반대입니다. '>' 모양입니다. 그림은 생략하겠습니다. 먼저 두 번째 노드를 우회전한 후 전체 노드를좌회전하면 됩니다.
좌회전과 우회전도 방법이 있습니다.
좌회전
아까 RR의 경우를 다시 보면요. 좌회전 한 번을 했더니 저 세 개의 노드가 어떻게 변했는지 보세요.
가장 위의 노드(12)는 두 번째 노드(18)의 왼쪽 자식이 되었고, 두 번째 노드(18)가 부모가 되었습니다. 이게 좌회전법입니다.
우회전
우회전은 반대입니다. 가장 위의 노드가(20) 두 번째 노드(18)의 오른쪽 자식이 되었습니다.
이제 코드로 구현해볼까요? 매우 길기 때문에 정의부, 삽입부, 삭제부 이렇게 나누어서 해야할 거 같습니다.
class Node(data) {
  data = data;
  left;
  right;
  bal = 0; // 왼쪽과 오른쪽의 차이를 저장
  constructor(data) {
    this.data = data;
  }
}
class AVL {
count = 0;
root;
taller;
shorter;
success;
// 삽입부 코드를 여기에
insert(data) {
this.taller = false;
const node = new Node(data);
this.root = this.#insert(this.root, node);
this.count++;
};
// 삭제부 코드를 여기에
delete(key) {
this.shorter = false;
this.succuess = false;
const newRoot = this.#delete(this.root, key);
if (this.success) {
this.root = newRoot;
this.count--;
return true;
}
return false;
};
search(key) {
if (this.root) {
return this.#search(key, this.root);
}
return false;
};
#search(key, root) {
if (root) {
if (key < root.data) {
return this.#search(key, root.left);
} else if (key > root.data) {
return this.#search(key, root.right);
} else {
return root;
}
}
return;
};
#rotateLeft(root) {
const temp = root.right; // temp를 중간 노드로 생각하면 이해하기 쉽다.
root.right = temp.left;
temp.left = root;
return temp;
};
#rotateRight(root) {
const temp = root.left; // temp를 중간 노드로 생각하면 이해하기 쉽다.
root.left = temp.right;
temp.right = root;
return temp;
};
return AVL;
})();여기까지가 정의부였는데요. 크게 메소드로 insert, delete, search가 있는데, insert와 delete는 안의 내부 메소드가 따로 있습니다. 이 부분을 구현해주어야 합니다. search는 보통의 트리 search와 같습니다. 추가적으로 좌회전, 우회전 메소드도 미리 넣어두었습니다. 위에서 설명한 것과 같다는 걸 알 수 있습니다.
다음은 삽입부입니다.
#insert(root, node) { // 내부적 insert 메소드
  if (!root) { // 트리의 말단 부분에 도달하면 바로 넣는다.
    root = node;
    this.taller = true;
    console.log('no root', root);
    return root;
  }
  if (node.data < root.data) { // 새 값이 루트 값보다 작으면
    root.left = this.#insert(root.left, node);
    console.log('go left', this.taller, root.bal);
    if (this.taller) { // 삽입으로 인해서 한 쪽이 더 길어졌으면
      switch (root.bal) {
        case 1: // 왼쪽이 더 긴 상태에서 또 왼쪽에 넣어줬으므로 LL 또는 RL
          root = this.#insLeftBal(root);
          break;
        case 0: // 균형이었던 상태에서 왼쪽에 넣어줬으므로 왼쪽이 길어짐
          root.bal = 1;
          break;
        case -1: // 오른쪽이 길었던 상태에서 왼쪽에 넣어줬기 때문에 균형
          root.bal = 0;
          this.taller = false;
          break;
      }
    }
    return root;
  } else { // 새 값이 루트 값보다 크면
    root.right = this.#insert(root.right, node);
    console.log('go right', this.taller, root.bal);
    if (this.taller) { // 삽입으로 인해서 한 쪽이 더 길어졌으면
      switch (root.bal) {
        case 1: // 왼쪽이 긴 상태에서 오른쪽에 넣어줬기 때문에 균형
          root.bal = 0;
          this.taller = false;
          break;
        case 0: // 균형이었던 상태에서 오른쪽에 넣어줬기 때문에 오른쪽이 길어짐
          root.bal = -1;
          break;
        case -1: // 오른쪽이 긴 상태에서 또 오른쪽에 넣어줬으므로 RR 또는 LR
          root = this.#insRightBal(root);
          break;
      }
    }
    return root;
  }
};

#insLeftBal(root) {
  const left = root.left;
  console.log('insLeftBal', left.bal);
  switch (left.bal) {
    case 1: // LL의 경우입니다.
      root.bal = 0;
      left.bal = 0;
      root = this.#rotateRight(root); // 우회전 한 번
      this.taller = false;
      break;
    case 0: // 균형인 경우는 없습니다.
      throw new Error('불가능한 경우');
    case -1: // RL의 경우입니다.
      const right = left.right;
      switch (right.bal) {
        case 1:
          root.bal = -1;
          left.bal = 0;
          break;
        case 0:
          root.bal = 0;
          left.bal = 1;
          break;
        case -1:
          root.bal = 0;
          left.bal = 1;
          break;
      }
      right.bal = 0;
      root.left = this.#rotateLeft(left); // 좌회전 후
      root = this.#rotateRight(root); // 우회전
      this.taller = false;
  }
};

#insRightBal(root) {
  const right = root.right;
  console.log('insRightBal', right.bal);
  switch (right.bal) {
    case -1: // RR의 경우입니다.
      root.bal = 0;
      right.bal = 0;
      root = this.#rotateLeft(root); // 좌회전 한 번
      this.taller = false;
      break;
    case 0: // 균형일 수는 없습니다.
      throw new Error('불가능한 경우');
    case 1:
      const left = right.left;
      switch (left.bal) { // LR의 경우입니다.
        case 1:
          root.bal = -1;
          right.bal = 0;
          break;
        case 0:
          root.bal = 0;
          right.bal = 1;
          break;
        case -1:
          root.bal = 0;
          right.bal = 1;
          break;
      }
      left.bal = 0;
      root.right = this.#rotateRight(right); // 우회전 후
      root = this.#rotateLeft(root); // 좌회전
      this.taller = false;
  }
  return root;
};
switch문에서 root.bal이 1이면 왼쪽이 긴 상태, 0이면 균형, -1이면 오른쪽이 더 긴 상태입니다. insLeftBal, insRightBal은 어떤 유형의 불균형인지 판단한 다음 회전을 시켜주는 부분입니다. 다음은 삭제부입니다. (포기하고 싶네요...)
#delete(root, key) {
  if (!root) { // 지울 게 없습니다.
    console.log('no root to delete');
    this.shorter = false;
    this.success = false;
    return;
  }
  if (key < root.data) { // 지울 값이 루트 값보다 작으면
    root.left = this.#delete(root.left, key);
    console.log('go left', root.left, this.shorter);
    if (this.shorter) { // 삭제로 인해 짧아졌으면
      root = this.#delRightBal(root);
    }
  } else if (key > root.data) { // 지울 값이 루트 값보다 크면
    root.right = this.#delete(root.right, key);
    console.log('go right', root.right, this.shorter);
    if (this.shorter) { // 삭제로 인해 짧아졌으면
      root = this.#delLeftBal(root);
    }
  } else { // key와 일치하는 데이터를 찾았을 때
    console.log('found', key, root);
    if (!root.right) { // 오른쪽 자식이 없으면 노드가 제거됐을 때 왼쪽 자식이 루트
      const newRoot = root.left;
      this.success = true;
      this.shorter = true;
      return newRoot;
    } else if (!root.left) { // 왼쪽 자식이 없으면 노드가 제거됐을 때 오른쪽 자식이 루트
      const newRoot = root.right;
      this.success = true;
      this.shorter = true;
      return newRoot;
    } else { // 삭제할 노드를 계속 왼쪽으로 보내서 제거(트리 강좌 참고)
      const temp = root.left;
      while (temp.right) temp = temp.right;
      root.data = temp.data;
      root.left = this.#delete(root.left, temp.data);
      if (this.shorter) { // 삭제로 짧아졌으면
        root = this.#delRightBal(root);
      }
    }
  }
  return root;
};

#delLeftBal(root) {
  console.log('delLeftBal', root, root.bal, root.left);
  switch (root.bal) {
    case 1:
      root.bal = 0;
      break;
    case 0:
      root.bal = -1;
      this.shorter = false;
      break;
    case -1:
      const left = root.left;
      if (left.bal === 1) { // RL의 경우
        const right = left.right;
        switch (right.bal) {
          case 1:
            left.bal = -1;
            root.bal = 0;
            break;
          case 0:
            root.bal = 0;
            left.bal = 0;
            break;
          case -1:
            root.bal = 1;
            left.bal = 0;
            break;
        }
        right.bal = 0;
        root.left = this.#rotateLeft(left);
        root = this.#rotateRight(root);
      } else { // LL의 경우
        switch (left.bal) {
          case -1:
            root.bal = 0;
            left.bal = 0;
            break;
          case 0:
            root.bal = -1;
            left.bal = 1;
            this.shorter = false;
            break;
        }
        root = this.#rotateRight(root);
      }
  }
  return root;
};

#delRightBal(root) {
  console.log('delRightBal', root, root.bal);
  switch (root.bal) {
    case 1:
      root.bal = 0;
      break;
    case 0:
      root.bal = -1;
      this.shorter = false;
      break;
    case -1:
      right = root.right;
      if (right.bal === 1) { // LR의 경우입니다.
        left = right.left;
        console.log('delRightBal LR', left.bal);
        switch (left.bal) {
          case 1:
            right.bal = -1;
            root.bal = 0;
            break;
          case 0:
            root.bal = 0;
            right.bal = 0;
            break;
          case -1:
            root.bal = 1;
            right.bal = 0;
            break;
        }
        left.bal = 0;
        root.right = this.#rotateRight(right);
        root = this.#rotateLeft(root);
      } else { // RR의 경우입니다.
        console.log('delRightBal RR', right.bal);
        switch (right.bal) {
          case 0:
            root.bal = -1;
            right.bal = -1;
            this.shorter = false;
            break;
          case -1:
            root.bal = 0;
            right.bal = 0;
            break;
        }
        root = this.#rotateLeft(root);
      }
  }
  return root;
};
delete 부분은 균형을 맞추는 부분을 제외하면 삭제할 노드를 계속 왼쪽으로 보내서 제거하는 tree의 삭제와 같습니다. 마지막으로 실행 부분입니다.
const avlTree = new AVL(); // 한 줄씩 치면서 어떻게 트리가 변하나 확인해보세요.
avlTree.insert(8);
avlTree.insert(12);
avlTree.insert(14);
avlTree.insert(18);
avlTree.insert(20);
avlTree.insert(23);
avlTree.insert(44);
avlTree.insert(52);
avlTree.delete(20);
후.. 긴 시간이었습니다. AVL 트리는 특성상 쉽게 설명하기가 어렵네요. 하지만 요즘은 슬프게도 AVL트리보다 레드 블랙 트리를 더 자주 쓰는 것 같습니다. ㅠㅠ 다음 시간에는 그래프에 대해서 알아보겠습니다!
 익명
익명
